3ds Max: Working with big scenes
Ravelin3D 2015-02-17 09:42 tutorial > 3ds MAX > misc
«How to make up a tremendous master plan better»
How we do it in Ravelin3D studio (tips and principles).
Click on image to enlarge
Large scene
Click on image to enlarge
Large scene
Click on image to enlarge
Large scene
Introduction
Based on the statistics on our site the visualization we make is more often designed for big residential complexes and villa communities. Sometimes these projects consist of dozens of multistory blocks, and the 3D-scenes include great number of greenery, automobiles, people and other objects of fillings.
The most frequent question we’re asked: «How do you render such tremendous scenes? How your 3D Max manages with it? Perhaps, you have really cool hardware«.
The answer is: No, the hardware we have is common as dirt. However, we work taking into account two important principles:
- We do not work on anything that cannot be seen by camera in the scene
- We organize our projects and workflow.
After reading this article, it can seem to you that these rules just slow down the work. However, this assumption is deceptive. These principles rapidly fall into habit, and the only thing you need is to constantly follow them.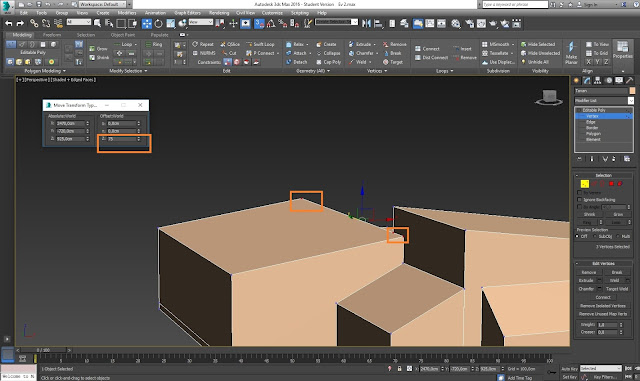
Click on image to enlarge
Large scene
Click on image to enlarge
Large scene
Hardware configuration
Let us start with typical configuration of computers that are used in Ravelin3D studio.
- Intel i7 3770k
- 32 GB RAM
- SSD drive
- Graphics card: GTX 650 2 GB
- x64 Windows, with possibility of passing over the restriction of 3 GB of possible physical memory.
As you can see, our computers are rather powerful, but not uncommon (quite up-to-date setup for 2015). The secret of success is scene organization and workflow.
Control polycount
The number of polygons the main scene rarely exceeds 16 millions.
- We don’t model minor details, we don’t bevel objects that will be placed far from camera.
- On the average, we put more than 200 thousand of polygons per a high-rise apartment building.

- We use «Turbosmooth» or «MeshSmooth» smoothing only when it is really necessary.
- If an object is smaller than 20 cm and it is not in front of camera, we do not model it.
If you want to sort quickly objects by polycount, add the «Faces» column to «Select by name» menu and sort all the objects by quantity of polygons.
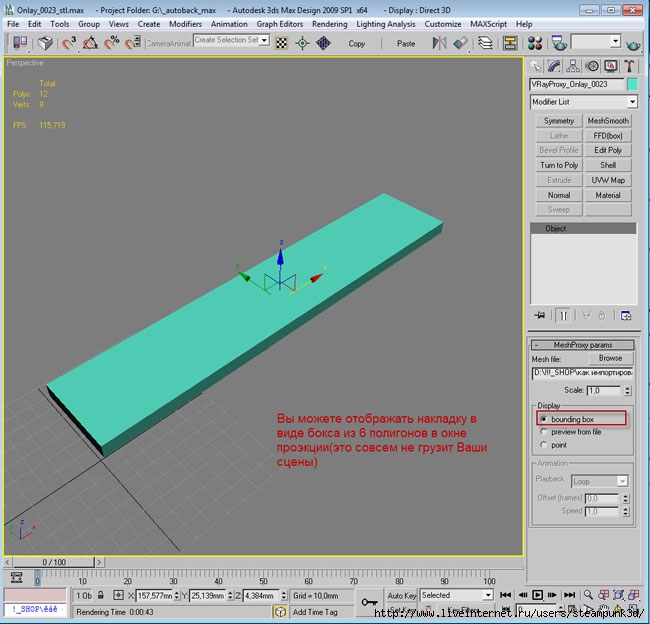
Use VrayProxy
We use «VrayProxy» for all objects with a lot polygons. This is very important, especially regarding trees, bushes and automobiles, as they consist of many polygons and, as a rule, we often copy them into scene. We convert objects into «VrayProxy» before importing them to scene. It is not worth the trouble to make conversion into «VrayProxy» in the main scene, it can lead to errors. After «VrayProxy» objects are put in scene, turn on the «Bounding Box» display mode, it will reduce the load on graphics card. It is especially relevant if the scene contains many «VrayProxy» objects.
Tip: The copy of “Instance” of each unique “VrayProxy” (for example, each unique tree) can be removed from working area and put in one place. Border this area with a rectangle — in such a way you won’t miss small “VrayProxy” colours or small bushes. This set can be easily exported to other scenes. Use this approach and you’ll have ready-made sets of “VrayProxy” frequently used objects at hand. You will not have to make them from scratch.
Instancing and scattering
If you need to copy objects, that will not be edited later, use copy as “Instance”. If there are more than 20 objects, use “MultiScatter”, especially when copying repeating objects (mostly greenery). Make “MultiScatter” presets for copying elements in advance.
Click on image to enlarge
The scene is on the left, grouped proxy and scattered sets of objects are on the right.
Click on image to enlarge
Large scene
Use Xref — You can find it under File > References > Xref scene
We use “Xref” to optimize workflow. It’s especially important, when several specialists work on the same project. With “Xref” you can build a scene from several parts. Each co-worker can work on his part independent of the rest of the team. Main scene will be constantly updated during this process.
Example: the project main scene is scene.max, which includes master plan, greenery, cars, and other objects. Houses for this project are in separate scenes “house1.max”, “house2.max”, etc.
Buildings “house1” and “house2” are uploaded in “scene.max” from individual files. They cannot be edited in “scene.max”, but they are rendered along with it. Quick and handy.
Click on image to enlarge
Xref files are helpful during teamwork
If necessary, you can turn off displaying these houses in viewport — it significantly saves resources.
Use Layers
We actively use layers for the purpose of convenience and work optimization.
Click on image to enlarge
Layers allow us to turn off a group of objects which is unnecessary at the moment.
Optimize materials and viewport
We use only JPEG textures. We recommend not using TIFF and PNG textures, since they consume a lot of memory and significantly slacken overall performance.
Use only “Vray” plugin materials. If there’s imported model with standard materials – pass it through “Vray mtl converter” plugin. It automatically converts all materials to “Vray” format and prevents all possible errors and drawbacks of displaying. We recommend checking big scenes with this plugin from time to time. Standard materials can be a cause of shut-downs when rendering. Use one copy of one material in a scene. Do not copy it unless necessary. For example, if one material is a part of “MultiSub”, than copy it there, using “Instance” copying. Optimize the number of “subdivs” parameter in materials. Do not overrate them unless necessary, the standard amount of “subdivs” – “8-20”. Sometimes in reflecting objects with the use of “glossy” parameter, the number of “subdivs” should be increased.
Optimized viewport is a formula for quick and effective work. For the sake of convenience when working with large scenes in viewport, we follow these rules:
- Use “Nitrous” mode in viewport when assembling scene.
- Hide textures, if you are not working with UVW Map. All textures can be hidden in Display > Shaded: object Color.
To increase viewport performance you can put multipolygonal objects in “Box” display mode.
Click on image to enlarge
All “VrayProxy” и “MultiScatter” objects are taken out of the working area in scene and are signed.
All “VrayProxy” objects, which aren’t worked at, are displayed as “Box”. Set all “MultiScatter” objects with ready settings to minimum values in “Preview” parameter, “Preview type: Box”.
Use “Adaptive Degradation” mode in viewport settings.
Color your groups. For example, all trees can be coloured with one colour using “Object color” parameter. In such a way it will be easier to understand the scene, and you’ll get handy masks as a bonus when rendering.
Use “Viewport clipping” when modeling.
Render regions
We actively use “Region render” computation method to change a scene and render the only changed area. If we change something and want to do a quick preview, we hide all “multiscatter” and “proxy” objects that are not used at the moment. This way we save memory and rendering is greatly accelerated.
Prepare scene to rendering
In our studio all images are rendered by means of “distributive render” on several computers. To avoid problems regarding parallel rendering follow the next rules:
- There should be no lost textures. Lost textures path can be restored using “AssetTracking” (Shift+T), if textures are impossible to find, replace them with grey “pads” with the same name and file extension.
Tip: when importing or merging a model from libraries to work scene, check and optimize it in a separate clean scene.
 It helps to avoid problem materials, lost textures and other troubles.
 - Scene should not contain Cyrillic characters or any other languages characters in names of objects, materials, scenes, etc. Only Latin characters. Network render doesn’t support Cyrillic characters, it’ll lead to errors when rendering.
- Scene should not include standard and Raytrace materials. It causes scene hanging up, shut-downs or spots.
We use rendering across a network, that’s why all work files should be on server. We don’t store files on local computers since in this case there will be places without textures in render or lost proxy.
Render standard settings:
Click on image to enlarge
Vray Global switches:
Reflection/refraction max depth: 3 — this parameter is enough for most of scenes. Unnecessary rereflections are not rendered. It can be increased when necessary.
Vray: System
Default geometry: Static
Dynamic memory limit: 30000 MB
It significantly speeds up rendering.
I hope my tips will help you when working with very large projects.
Follow us on our Behance account: https://www.behance.net/ravelin
Good luck!
Click on image to enlarge
Final image after post production
Author: Ravelin3D Editor: Michał Franczak
Tweet | 11
Tags: scene proxy large tip huge ravelin3d
You may also like…
Tip of the Week. Create a couch using cloth simulation
Got no time to make realistic model of couch, sofa, pillow or chair seat? Why not simulate it with cloth modifier? It is much faster than traditional modeling.
×
LEAVE A COMMENT
How to remove virus in 3Ds Max manually without scripts and plugins
Translation available in two languages English and Русский
In this article, today we will look at how to remove the most common ALC and CRP viruses that have appeared on literally every 3D Stock, without using any scripts or plugins, how to prevent reinfection and how not to become a victim of fake antivirus software.
But first, what are viruses in 3Ds Max and where did they come from?
Loading…
The first mentions of strange non-removable objects that get into the scene appeared at the end of 2016. Then no one understood the strange appearance of Helpers in the scene with the names «¡¡×ý × û» and «×þ×ü» and it was assumed that these were objects of unsuccessful import from Auto CAD or similar programs.
As far as we know, ALC and CRP started their journey with Chinese 3D Stocks. But no one expected that by downloading a free model, you get such a «gift «.
ALC and CRP viruses gained more widespread distribution by the end of 2017, since there was no protection at that time, they got to 3D Stocks without any problems. Actually, this has become a key factor in the distribution and a global problem. Below I will write in detail about the ALC virus, since CRP is very similar to it.
Having tried different removal options using Maxscript, I accidentally managed to cause an error in the script controller, into which the malicious code was written. I saw a lot of obfuscated text in the Listener (Maxscript console), after careful analysis and reverse engineering, I was able to understand how this code works.
To my surprise, the malicious script tried to write itself to the script startup folder, registered callbacks, and launched when Merge, Open, X-Ref and other scene operations were performed. This meant that even if the files were removed from startup, any action with the scene could run the code to write itself back to files again, and Helpers that are not removed contributed to the initialization of this process.
The behavior reminded me of a typical «worm virus «, so I named it worm.3dsmax.alc.clb.
The security logic for commercial models or scenes was incorporated in the code. If it did not pass authentication, then ALC could change scene settings, materials, remove lights, etc. And in the latest modifications of ALC3, your renders and personal information can generally be sent to the C&C servers!
Although ALC was conceived as a form of protection for commercial projects of scenes and models, due to the incorrect operation of the code itself, 3Ds Max could malfunction, the undo function (CTRL+Z) could not work, and various kinds of bugs.
In the ALC code, there are no specific lines to break the undo function (CTRL+Z), cause a crash on startup, or slow down the 3Ds Max — these are all problems of poor adaptation of the code.
However, we have a script that spreads itself between scenes, can cause 3Ds Max to crash, break some functions like CTRL+Z, change something in the scene, degrade performance and interrupt the workflow, so it’s correct to call it — a virus!
Since this is a regular script that is executed in the 3Ds Max environment, no one Anti-Virus can detect these viruses. They can be removed manually or with special scripts like Prune Scene.
It doesn’t matter for what purpose or intentions it was created, in fact we have only one troubles and we cannot try to ignore this problem. I recommend sharing this article so everyone knows how to protect their work!
Distribution scheme for ALC and CRP
So, as it was written above, the ALC virus get to the scene under the guise of Helpers, in the Scale script controller. 3Ds Max is designed in such a way that when the scene is opened, all script controllers are executed. Thus, the execution of malicious code occurs.
Next, the script writes its code to hidden files in the script startup folder:
vrdematcleanbeta.ms
vrdematcleanbeta.mse
vrdematcleanbeta.msex
Also, so-called callbacks are created, and the code from the script controller is also written in them and executed with Open, Merge, X-Ref.
Now let’s imagine how it all works in combination: When you start 3Ds Max, scripts from the startup folder are executed, which create Helpers and write to callbacks. These auxiliary objects cannot be deleted and they easily migrate between scenes.
With each Open, Merge, X-Ref, Helpers are also created and a startup is recorded, after which the scene is automatically saved. When you open a scene with Helpers, all the same actions are performed: writing to startup, creating callbacks, automatic saving.
Thus, even if you delete files from startup, and somehow remove Helpers, a callback will still be executed, which will start the whole process again!
For the CRP virus, the scheme is the same, except that it is not written to the script controller, but to the Persistent global variable, which is saved with the scene and executed when the scene is started. And it injects malicious code into startup scripts.
How to remove ALC and CRP viruses manually
Removing hidden files from the startup folder will help prevent malicious code from running when 3Ds Max starts. Removal also helps if 3Ds Max does not start after infection or the program closes abnormally!
Close 3Ds Max. Go to the following folders:
C:/Users/User Name/AppData/Local/Autodesk/3dsMax/xxxx- 64bit/ENU/scripts/startup
C:/Program Files/Autodesk/3Ds Max xxxx/scripts/Startup
Note!
Red indicates username and version, which may differ from you.
Next, you need to display hidden system files. To do this, go to the View tab, click Options.
Loading…
In the window that opens, go to the View tab and disable Hide protected operating system files (Recommended).
Loading…
The following files indicate the presence of a virus:
Loading…
Remove all hidden files from these folders!
Note!
If you are not sure what you are doing right and are afraid of messing up your workflow, download and install Prune Scene.
Prune Scene — will help to correct the consequences of infection and do all the necessary work for you!
Check each script in these folders for malicious code injection.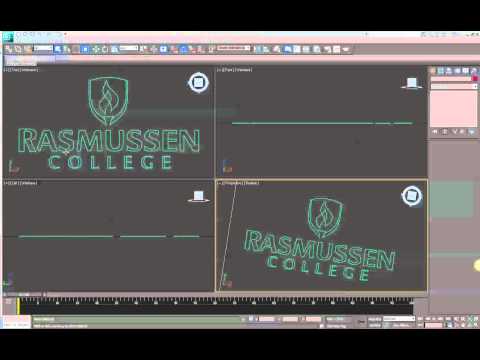 Open the file with the text editor Notepad, if the search for the file does not find «CRP_AScript«, then the file is clean.
If you find «CRP_AScript«, you must remove this part of the code, from the line in which the phrase was found to the end of the file. Then save the file.
Launch 3Ds Max, you should no longer see hidden Helpers or feel other effects of viruses.
Warning!
It should be keep in mind that this way you have removed viruses from your 3Ds Max! But if you open an infected scene, the process will start over. It is impossible to remove viruses from infected scenes without special antivirus scripts like Prune Scene!
Download Prune Scene Free
Simple virus protection
Sample text
Я думаю, многие читатели уже догадались, что необходимо запретить доступ на запись в папки автозагрузки скриптов.
Для этого для папок:
I think many people have already guessed that it is necessary to deny write access to the scripts startup folders.
To do this, for the folders:
C:/Users/User Name/AppData/Local/Autodesk/3dsMax/xxxx- 64bit/ENU/scripts/startup
C:/Program Files/Autodesk/3Ds Max xxxx/scripts/Startup
Set write protection through the properties of the (Read Only) folder.
Note!
Write protection helps you avoid virus spreading problems. But it should be keep in mind that some scripts can no longer be added or modified. For example, if you have MegaScans Bridge installed, you will most likely receive an error and will not be able to launch it.
It is worth treating with understanding and responsibility, the ban on writing to these folders!
Open the file with a text editor:
C:/Users/User Name/AppData/Local/Autodesk/3dsMax/xxxx- 64bit/ENU/3dsMax. ini
ini
Find the following parameters and set the value for them to «0».
LoadStartupScripts=0
LoadSaveSceneScripts=0
LoadSavePersistentGlobals=0
Set write protection for the 3dsMax.ini file.
Note!
By setting write protection for 3dsMax.ini and changing the described parameters, some 3Ds Max settings may not be saved in the future! And also Custom Attributes and some animation controllers may not work.
It is worth understanding what blocking writing to the 3dsMax.ini settings file can affect!As described above, viruses can write to callbacks and execute malicious code on Open, Merge, X-Ref files. This means that if you run a scene with a virus, all subsequent files that are opened will be infected as long as the current 3Ds Max session is open.
If you do not want to endure the inconvenience associated with the inability to save settings or problems with scripts in autorun, such as MegaScans or file infection in the current session, I recommend using specialized software for tracking and removing Prune Scene viruses.

Beware of scammers!
Recently, I have seen more and more different kinds of «Antivirus» appear, which help with cleaning script viruses. Moreover, they release not only scripts, but third-party applications (programs).
Gullible users download software from unknown resources and unknown brands, which most likely contains a Trojan or other more serious computer virus.
Important!
Never download *.exe files or run them! This also applies to the installation of different plugins * .dlo, * .dlc, * .dll, etc.
Do not download anything from Chinese sites or unverified resources!
There is a great risk that unscrupulous developers could add malicious code there !
At the moment I know only a few proven developers: 3DGROUND Prune Scene (7 years), SiNI Software Forensic (6 years) and Autodesk Security Tools. Download anything else, I highly do not recommend!
3DGROUND Prune Scene is a simple, free, lightweight script with easy installation.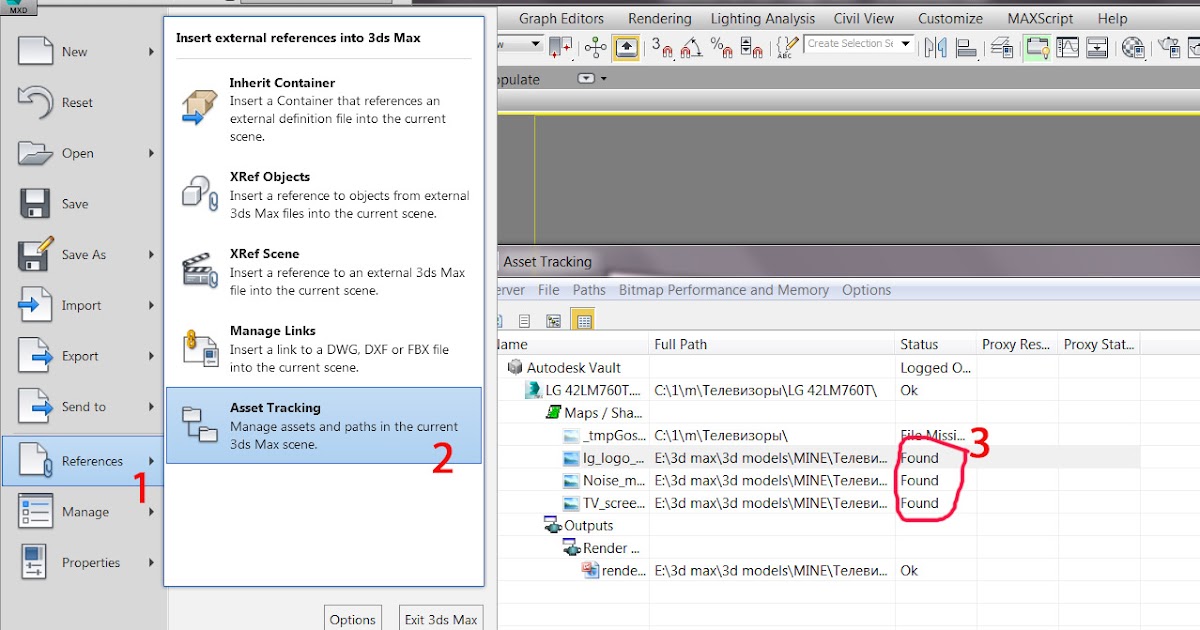 Doesn’t need to restart 3Ds Max after installation. It has the largest number of virus signatures at the moment. The startup folder is protected from re-infection. Well-optimized signatures do not slow down 3Ds Max. Has a super function — search for viruses in the file system, without opening the files themselves! Updates are released quite often, and if you have a license, you can update «over the air» by clicking just one Update button in just a second.
Autodesk Security Tools — the official antivirus from Autodesk, updated not as often as we would like. Quite complex installation via Windows Installer. Has fewer viral signatures compared to analogues. The code is not written optimized and may cause slowdowns in 3Ds Max.
SiNI Software Forensic is a full-fledged plugin that works faster than scripts, but has a number of shortcomings. Quite difficult to install and understand. Requires 3Ds Max restart after installation or update. There is a dependence on 3Ds Max versions.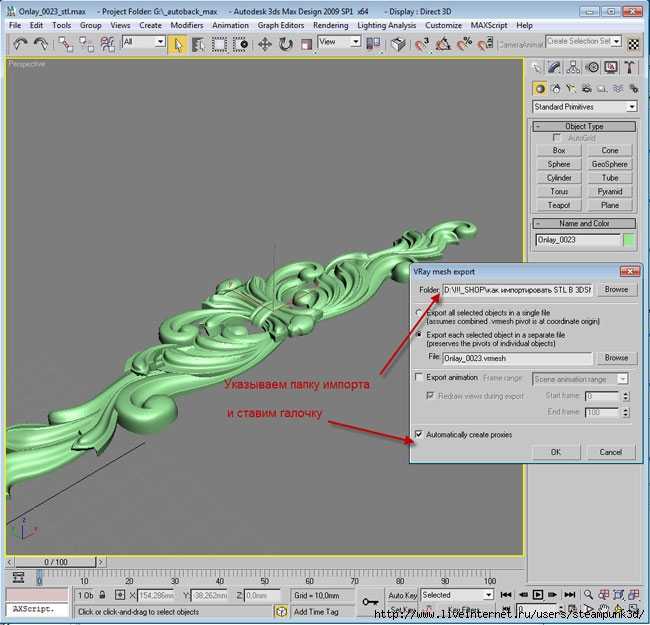 Updates are not released as often. Has a complex licensing system. An internet connection is required even if you are using the free version. Has the same number of virus signatures as Autodesk Security Tools.
Use software from this list and be careful!
Создание файлов GLB с помощью 3ds Max и Substance Painter · Справочный центр Shopify
Эта страница была напечатана 02 ноября 2022 г. Актуальную версию можно найти на странице https://help.shopify.com/en/partners/resources/creating-media/3d-models/creating-3d-models/3ds-max. .
Используйте 3ds Max и Substance Painter для экспорта файла GLB, который можно добавить к продукту в админке Shopify.
Подготовьте модель к экспорту в 3ds Max
Чтобы подготовить модель к экспорту, необходимо убедиться, что это одна сетка и к ней применен один материал.
Шагов:
- Нажмите Файл > Импорт… > Импорт…
- Выберите файл модели и нажмите Открыть .
- В диалоговом окне OBJ Import Options установите флажок Import as a single mesh .
- Нажмите Импорт .
- Разверните модель в пространстве 0-1. Убедитесь, что UV не перекрываются:
- Применение одного материала ко всей модели.
Экспорт сетки из 3ds Max
- Нажмите Файл > Экспорт > Экспорт…
- Введите имя файла и место, куда вы хотите экспортировать модель.
- В раскрывающемся меню Сохранить как тип выберите OBJ-Export (.OBJ) .
- Щелкните Сохранить .
- В диалоговом окне Параметры экспорта OBJ оставьте параметры по умолчанию без изменений и нажмите Экспорт .
Импорт и подготовка файла OBJ в Substance Painter
- Создайте новый проект Substance Painter, нажав File > New .

- В диалоговом окне Новый проект нажмите Выберите , чтобы выбрать сетку.
- Выберите файл OBJ, который вы экспортировали из 3ds Max, и нажмите Открыть .
- В окне Новый проект нажмите OK .
Убедитесь, что вы правильно экспортировали свою сетку, проверив наличие только одного набора текстур на панели списка наборов текстур .
Если вы видите более одного набора текстур, см. Несколько наборов текстур .
В панели настроек набора текстур нажмите кнопку
+, чтобы добавить каналы:- Требуется: Ambient occlusion.
- Дополнительно: эмиссионный. Добавьте этот канал, если в вашей модели есть компоненты, излучающие свет.
- Необязательно: Непрозрачность. Добавьте этот канал, если в вашей модели есть компоненты, которые будут прозрачными.

На панели настроек набора текстур нажмите Bake Mesh Maps .
Нанесите текстуры на модель.
Несколько наборов текстур
При импорте файла OBJ в Substance Painter вы должны увидеть только один набор текстур:
Если вы видите более одного набора текстур, то при экспорте сетки из 3ds Max произошла одна из следующих ошибок:
- Сетка не была объединена в единый объект.
- Сетке назначено более одной текстуры.
В этом случае снова экспортируйте модель из 3ds Max и убедитесь, что сетка представляет собой единый объект и имеет только одну назначенную ей текстуру.
Экспорт файла glTF из Substance Painter
- Щелкните Файл > Экспорт текстур .
- В раскрывающемся меню Config выберите glTF PBR Шероховатость металла .
- Выберите место, где вы хотите сохранить свои текстуры.

Выберите размер документа, чтобы определить размер файлов текстур.
Наконечник
Обычно текстуры не должны быть больше 2048 x 2048 пикселей. По возможности используйте 1024 x 1024 пикселей, чтобы значительно уменьшить общий размер файла.
Нажмите Экспорт .
Сжатие файлов текстур
После экспорта модели у вас должны быть следующие файлы:
- имя_модели.bin
- имя_модели.glb
- имя_модели.gltf
- modelNamebaseColor.png
- имя моделиnormal.png
- modelName_occlusionRoughnessMetallic.png
При использовании конфигурации glTF PBR Metal Roughness Substance Painter экспортирует файлы текстур только в формате PNG. Рассмотрите возможность сжатия файлов текстур и преобразования любых текстур, которым не требуется альфа-канал, в JPG. Это уменьшает общий размер файла, а файлы меньшего размера обеспечивают более высокую скорость загрузки и более плавное взаимодействие.
Размер файла лучше не превышать 4 МБ.
Создать файл GLB
Примечание
Если вы меняете изображения PNG на JPG, вам нужно отредактировать читаемый файл glTF и изменить необходимые ссылки PNG на JPG, прежде чем упаковывать glTF в GLB. Откройте файл glTF в текстовом редакторе, измените имена файлов с PNG на JPG и сохраните файл.
- Посетите https://glb-packer.glitch.me/.
- Перетащите файлы, экспортированные из Substance Painter, на веб-страницу GLB Packer.
Файл с именем out.glb будет загружен на ваш компьютер. После завершения загрузки вы можете переименовать файл, а затем загрузить его в Shopify.
Как исправить ошибки Autodesk.max.dll Not Found (Missing)
Проблемы autodesk.max.dll обычно вызваны повреждением файла или случайным или злонамеренным удалением файла DLL из другого Autodesk 3DS Max. расположение файлов. Большой процент этих проблем с файлами можно решить, загрузив и установив последнюю версию вашего DLL-файла. Кроме того, поддержание чистого и оптимизированного реестра Windows может помочь предотвратить недопустимые ссылки на пути к файлам DLL, поэтому мы настоятельно рекомендуем регулярно выполнять сканирование реестра.
Системные файлы формата Dynamic Link Library обычно имеют расширение DLL. Если вам необходимо заменить файл autodesk.max.dll, вы можете найти версию %%os%% в нашей базе данных, указанную в таблице ниже. Если ваша точная версия autodesk.max.dll в настоящее время недоступна, запросите копию, нажав кнопку «Запрос» рядом с нужной версией файла. Некоторые версии файлов могут отсутствовать в нашей обширной базе данных, и в таких случаях вам может потребоваться связаться с Autodesk.
Поместите этот новый файл autodesk.max.dll в то же место (перезаписав предыдущий), и ваша проблема должна быть решена, но вы должны проверить, чтобы быть уверенным. Подтвердите, что ошибка устранена, попытавшись открыть Autodesk 3DS Max и/или выполнив операцию, которая вызывает проблему.
| Autodesk.max.dll Описание файла | |
|---|---|
| Вн.: | DLL |
| Тип приложения: | 3D компьютерная графика и дизайн, AutoCad |
| Приложение: | Autodesk 3DS Max |
| Версия ПО: | 15.0.0.347 |
| Создатель: | Автодеск |
| Имя файла: | autodesk.max.dll |
| Байт: | 2098176 |
| ША-1: | 7defc81164ce213d163a14a9d2c7f8bea3e10f89 |
| MD5: | 65e8d642d0ffc36644ae596cba2b662a |
| CRC32: | |
Продукт Solvusoft
Загрузить
WinThruster 2022 — Сканировать ваш компьютер на наличие ошибок реестра autodesk. max.dll0003
Дополнительное предложение для WinThruster от Solvusoft | ЛСКП | Политика конфиденциальности | Условия | Uninstall
DLL
autodesk.max.dll
Article ID: 1005849
Autodesk.max.dll
1
OS
Windows 7
2
App
Autodesk 3DS Max
⟩
| Имя файла | Контрольная сумма MD5 | Размер файла | Скачать | ||||||||||||||||||||
|---|---|---|---|---|---|---|---|---|---|---|---|---|---|---|---|---|---|---|---|---|---|---|---|
| + autodesk.max.dll | 65e8d642d0ffc36644ae596cba2b662a | 2,00 МБ | |||||||||||||||||||||
| |||||||||||||||||||||||
 0.0.347
Ошибки Autodesk.
 max.dll
Наиболее распространенные ошибки autodesk.max.dll, которые могут появиться на компьютере под управлением Windows:
- «Не удается найти Autodesk.max.dll».
- «Отсутствует файл Autodesk.max.dll.»
- «Autodesk.max.dll нарушение прав доступа.»
- «Не удается зарегистрировать autodesk.max.dll.»
- «Не удается найти D:\Autodesk\3ds Max 2013\autodesk.max.dll».
- «Не удается загрузить Autodesk 3DS Max — отсутствует требуемый файл autodesk.max.dll. Установите Autodesk 3DS Max еще раз».
- «Сбой приложения, так как не найден файл autodesk.max.dll. Повторная установка Autodesk 3DS Max может решить проблему».
Такие сообщения об ошибках DLL могут появляться в процессе установки программы, когда запущена программа, связанная с autodesk.max.dll (например, Autodesk 3DS Max), при запуске или завершении работы Windows, или даже при установке операционной системы Windows. Если вы видите ошибку autodesk.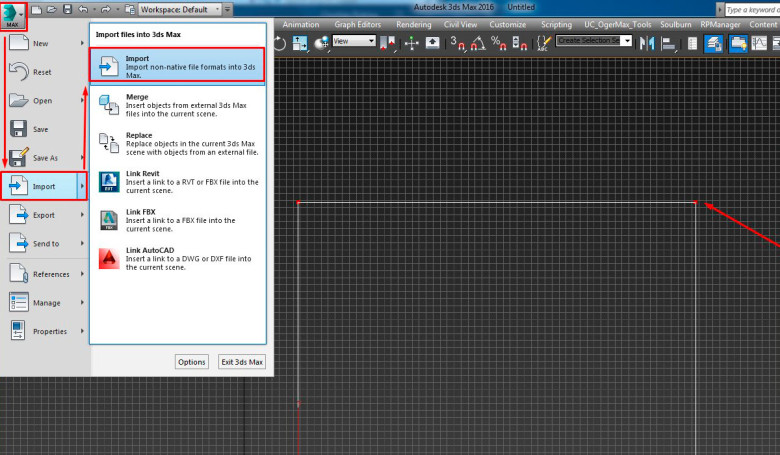 max.dll, запишите случаи, чтобы устранить неполадки Autodesk 3DS Max и помочь Autodesk найти причину.
Источники проблем Autodesk.max.dll
Отсутствующие или поврежденные файлы autodesk.max.dll являются распространенными источниками ошибок autodesk.max.dll. Внешние файлы, такие как autodesk.max.dll, с высокой вероятностью создают проблемы с Autodesk 3DS Max.
Неправильное завершение работы компьютера или файлы autodesk.max.dll, зараженные вредоносным ПО, могут вызвать проблемы с Autodesk 3DS Max, что приведет к ошибкам повреждения. Когда ваш файл autodesk.max.dll повреждается, он не может быть загружен должным образом и выдает сообщение об ошибке.
В редких случаях проблемы с записями реестра Windows для Autodesk 3DS Max могут вызвать ошибку autodesk.max.dll. Поврежденные ссылки пути файла autodesk.max.dll к Autodesk 3DS Max препятствуют правильной загрузке файла, создавая ошибки autodesk.max.dll. Неверные пути реестра autodesk.max.dll могут быть связаны с перемещением файлов autodesk.